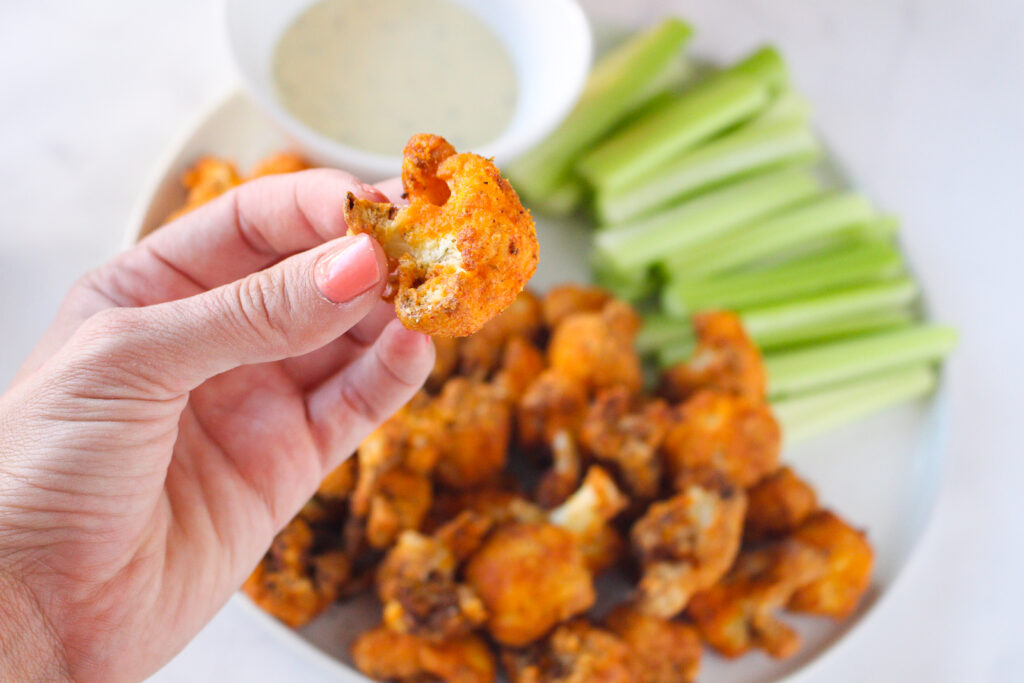
Air Fryer Buffalo Cauliflower Bites (gluten-free)
February 09, 2022 at 11:26AM
SO pumped to share this gluten-free buffalo cauliflower bites recipe for you! This recipe is perfect for game day, an evening with friends, a fun appetizer, or a unique dinner side dish.
Hi hi! How are you doing?? I hope you’re having a great week so far. I’ve been living the Zoom life – so much fun talking to so many new 1:1 nutrition clients – teaching classes, and doing all of the usual things with the crew. 😉 I hope you’re having a good week, too!
For today’s post, I’m excited to share a recipe that’s perfect for the Super Bowl, an easy side dish, or awesome appetizer: gluten-free air fryer buffalo cauliflower!
Mia created this recipe for the blog and I was so pumped to test it out. We had these on Sunday afternoon, and the kids looooooooved them.
Here’s the recipe if you’d like to give it a try!
Air Fryer Buffalo Cauliflower Bites (gluten-free)
How to make buffalo cauliflower in the air fryer
Ingredients
½ Large head of cauliflower cut into florets- bite size
2 eggs, lightly beaten
¾ cup blanched almond or cashew flour
⅓ cup tapioca flour (can sub cassava flour)
1¼ tsp chili powder
¾ tsp paprika
½ tsp onion powder
1 pinch cayenne powder
Hefty pinch of salt
Fresh cracked black pepper
Avocado oil spray- to prevent sticking
½ cup The New Primal Buffalo sauce (mild)
2 tbsp Primal Kitchen Buffalo sauce, plus more for dipping if you like super spicy bites!
1 bunch celery hearts, cleaned & cut into sticks for dipping
¼ c. Primal Kitchen Ranch dressing
Directions
Step one
Line two baking sheets with parchment paper and set aside. One will be used for the raw cauliflower and one for the cooked.
Step two
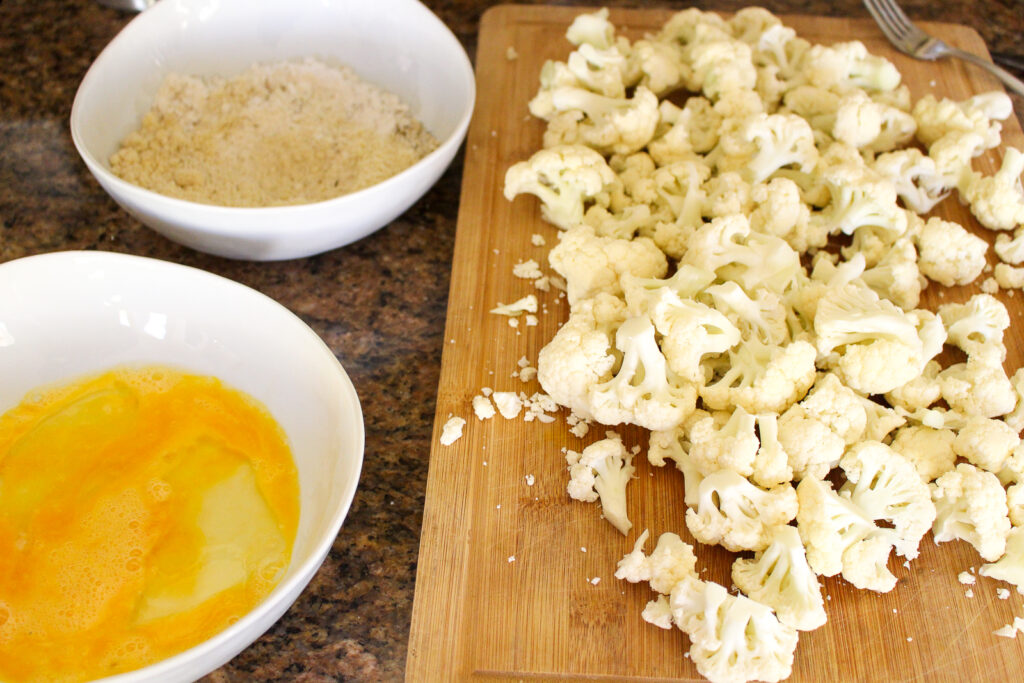
In a bowl, combine the almond/cashew flour, tapioca or cassava flour, chili powder, paprika, onion, cayenne, salt & pepper.In another small bowl, add the eggs and 2 tbsp water. Add cauliflower to a separate bowl next to the eggs and flour mixture. This is setting up a “breading” station. Dip each cauliflower floret into the egg mixture and fully coat. Roll in the flour mixture, coating and shake off any excess. Place on a baking sheet and repeat with remaining cauliflower. *Note, use one hand for the egg mixture and your other hand for the wet mixture to prevent your fingers from becoming breaded.
Step three
Heat the air fryer to 375 degrees for about 5 minutes. Once the timer goes off, spray the bottom of the air fryer basket with avocado oil and place the cauliflower in the air fryer keeping them evenly spaced and spread out. Spray the top of the cauliflower with avocado oil.
Step four
You will need to do this in batches if you have a small air fryer.
Air fry the cauliflower at 375 degrees F for 15 minutes. Tip: place the cauliflower in the oven on the prepared baking sheet to keep warm if you’re doing this in batches. Once the cauliflower is almost finished, warm the buffalo sauce in a small, glass bowl. This is best done in the microwave.
Step five
When the cauliflower is finished, drizzle the buffalo sauce over the cauliflower on the prepared baking sheet. Gently toss, ensuring the breading doesn’t fall off. You can stick it back in the air fryer again at 400 degrees for 5 minutes if you like extra crispy cauliflower.
Serve with celery and ranch dressing (we order the Primal Kitchen one from Thrive Market). Enjoy!
.tasty-recipes-print-button{background-color:#667;border:none;display:inline-block;padding:.5em 1em;text-decoration:none}body:not(.tasty-recipes-print-view) .tasty-recipes-print-button.tasty-recipes-print-above-card{color:#fff;display:none}body:not(.tasty-recipes-print-view) .tasty-recipes-print-button.tasty-recipes-print-above-card:hover{background-color:#b2b2bb;color:#fff;display:inline-block;padding:.5em 1em;text-decoration:none}.tasty-recipes-image-button-container{display:flex;flex-direction:column;flex-wrap:wrap;float:right;margin-left:10px}body.tasty-recipes-print-view .tasty-recipes-buttons{display:none}.tasty-recipes-image-button-container .tasty-recipes-buttons{margin-bottom:10px;margin-top:10px}.tasty-recipes-image-button-container .tasty-recipes-button-wrap{box-sizing:border-box;margin-bottom:10px}.tasty-recipes-image-button-container .tasty-recipes-buttons a{background-color:#f9f9f9;border:1px solid #aaa;border-radius:0;color:#aaa;display:block;font-size:16px;font-weight:700;line-height:16px;margin-top:0;padding:8px;text-align:center;text-decoration:none;text-transform:uppercase}.tasty-recipes-image-button-container .tasty-recipes-buttons .button:hover{background-color:#aaa;border:1px solid #aaa;color:#fff;opacity:1}.tasty-recipes-image-button-container .tasty-recipes-buttons a:hover{background-color:#979599;text-decoration:none}.tasty-recipes-image-button-container .tasty-recipes-buttons svg{display:none}.tasty-recipes-yield-scale{border:1px solid #979599;border-radius:2px;color:#979599;font-size:.7rem;margin-left:3px;padding:0 4px}.tasty-recipes-units-scale-container{display:flex;flex-wrap:wrap}.tasty-recipes-convert-container{padding:0 1em 1em 0}.tasty-recipes-convert-container .tasty-recipes-convert-label{align-self:center;color:#979599;font-size:.6rem;text-transform:uppercase}.tasty-recipes-convert-container button{background:transparent;border:1px solid #979599;border-radius:2px;color:#979599;letter-spacing:0;margin-left:5px;min-width:34px;padding:2px 4px;text-align:center}.tasty-recipes-convert-container button.tasty-recipes-convert-button-active{border-color:#353547;color:#353547}.tasty-recipes-convert-container button:focus{outline:none}.tasty-recipes-scale-container{display:flex;padding:0 0 1em}.tasty-recipes-scale-container .tasty-recipes-scale-label{align-self:center;color:#979599;font-size:.6rem;text-transform:uppercase}.tasty-recipes-scale-container button{background:transparent;border:1px solid #979599;border-radius:2px;color:#979599;letter-spacing:0;margin-left:5px;min-width:34px;padding:2px 4px}.tasty-recipes-scale-container button.tasty-recipes-scale-button-active{border-color:#353547;color:#353547}.tasty-recipes-scale-container button:focus{outline:none}.tasty-recipes-ingredients-header{margin:1em 0}@media only screen and (min-width:520px){.tasty-recipes-ingredients-header{align-items:center;display:flex;flex-wrap:wrap;justify-content:space-between}}.tasty-recipes-ingredients-header .tasty-recipes-ingredients-clipboard-container{align-items:baseline;display:inline-flex}.tasty-recipes-ingredients-header h3{margin:0 10px 10px 0}.tasty-recipes-ingredients-clipboard-container .tasty-recipes-copy-button{background:transparent;border:none;color:#353547;height:24px;padding:0;position:relative;width:24px}.tasty-recipes-ingredients-clipboard-container .tasty-recipes-copy-button:hover{opacity:.5}.tasty-recipes-instructions-header{align-items:baseline;display:flex;flex-wrap:wrap;justify-content:space-between;margin:1em 0}.tasty-recipes-entry-content .tasty-recipes-instructions h3{margin:0 0 1rem}@media only screen and (min-width:520px){.tasty-recipes-entry-content .tasty-recipes-instructions h3{margin:0}}button[name=tasty-recipes-video-toggle]{background:#979599;border:#979599;border-radius:2px;display:inline-block;font-size:14px;height:30px;line-height:20px;margin:0;padding:0;text-align:center;vertical-align:middle;width:86px}button[name=tasty-recipes-video-toggle] span{padding:0 4px;pointer-events:none}button[name=tasty-recipes-video-toggle][aria-checked=false] :last-child,button[name=tasty-recipes-video-toggle][aria-checked=true] :first-child{background:#fff;border-radius:2px;color:#979599;padding:2px 4px}button[name=tasty-recipes-video-toggle][aria-checked=false] :first-child,button[name=tasty-recipes-video-toggle][aria-checked=true] :last-child{color:#fff}label[for=tasty-recipes-video-toggle]{color:#979599;font-size:.6rem;line-height:30px;padding-right:8px;text-transform:uppercase;user-select:none;-moz-user-select:none;-ms-user-select:none;-webkit-user-select:none;-o-user-select:none;vertical-align:middle}.tasty-recipe-responsive-iframe-container{margin:10px 0}.tasty-recipes-equipment{display:flex;flex-wrap:wrap;justify-content:space-evenly}.tasty-recipes-equipment>h3{flex:0 0 100%}.tasty-recipes-equipment .tasty-link-card{flex:0 0 50%;padding:1.5rem 1rem;text-align:center}@media screen and (min-width:500px){.tasty-recipes-equipment .tasty-link-card{flex:0 0 33%}}.tasty-recipes-equipment .tasty-link-card p{font-size:1em;font-weight:700;margin-bottom:0}.tasty-recipes-equipment .tasty-link-card p a{color:initial}.tasty-recipes-equipment .tasty-link-card span{font-size:.9em}.tasty-recipes .tasty-recipes-nutrition ul{list-style-type:none;margin:0;padding:0}.tasty-recipes .tasty-recipes-nutrition ul:after{clear:both;content:” “;display:block}.tasty-recipes .tasty-recipes-nutrition li{float:left;list-style-type:none;margin-bottom:0;margin-left:0;margin-right:16px}.tasty-recipes-plug{align-items:center;display:flex;flex-wrap:wrap;justify-content:center;margin-bottom:1em;text-align:center}.tasty-recipes-plug a{box-shadow:none;text-decoration:none}.tasty-recipes-plug a img{display:inline-block;height:auto;margin:5px 0 0 8px;width:150px}.tasty-recipes-footer-content{padding:1.5em;text-align:center}.tasty-recipes-footer-content .tasty-recipes-footer-copy{margin-left:0}.tasty-recipes-footer-content img,.tasty-recipes-footer-content svg{width:60px}.tasty-recipes-entry-content .tasty-recipes-entry-footer h3{font-size:1.25em;margin:0 0 .25em;padding:0}.tasty-recipes-entry-footer p{font-size:.75em;margin:0}.tasty-recipes-entry-footer p a{border-bottom:none;box-shadow:none;text-decoration:underline}.tasty-recipes-flash-message{background-color:#fff;border-radius:4px;box-shadow:0 .3px .4px 0 rgba(0,0,0,.024),0 .9px 1.5px 0 rgba(0,0,0,.05),0 3.5px 6px 0 rgba(0,0,0,.1);color:#313135;display:inline-block;font-size:13px;letter-spacing:0;line-height:1.2em;margin-left:10px;padding:4px 10px}@media screen and (min-width:500px){.tasty-recipes-flash-message{padding:4px 10px}}.tasty-recipes-flash-message p{margin:0;padding:0;text-transform:none}@media screen and (min-width:500px){.tasty-recipes-footer-content{align-items:center;display:flex;justify-content:center;padding:1.5em 0;text-align:left}.tasty-recipes-footer-content .tasty-recipes-footer-copy{margin-left:.8em}}@media print{.tasty-recipes-no-print,.tasty-recipes-no-print *{display:none!important}}[data-tr-ingredient-checkbox]{cursor:pointer;list-style-position:outside;list-style-type:none!important;margin-left:0!important}[data-tr-ingredient-checkbox] .tr-ingredient-checkbox-container{position:relative}[data-tr-ingredient-checkbox] .tr-ingredient-checkbox-container input[type=checkbox]+label{display:inline-block;position:relative;vertical-align:middle}[data-tr-ingredient-checkbox] .tr-ingredient-checkbox-container input[type=checkbox]{clip:rect(1px 1px 1px 1px);clip:rect(1px,1px,1px,1px);height:1px;overflow:hidden;position:absolute!important;width:1px}[data-tr-ingredient-checkbox] .tr-ingredient-checkbox-container input[type=checkbox]+label:before{border:1px solid;border-radius:2px;content:””;display:inline-block;height:20px;margin-right:10px;position:relative;width:20px}[data-tr-ingredient-checkbox] .tr-ingredient-checkbox-container input[type=checkbox]:checked+label:after{border-bottom:2px solid;border-left:2px solid;content:””;display:inline-block;height:6px;left:4px;position:absolute;top:4px;transform:rotate(-45deg);width:12px}[data-tr-ingredient-checkbox] .tr-ingredient-checkbox-container input[type=checkbox]:focus+label:before{box-shadow:0 0 8px #5e9ed6;outline:1px solid #5d9dd5}[data-tr-ingredient-checkbox=checked]{opacity:.8;text-decoration:line-through}/* Tasty Recipes Simple recipe card styles */ .tasty-recipes-display{border:0.15em solid #ededed;padding:1.5em;margin-bottom:1em}.tasty-recipes-plug{margin-bottom:1em}.tasty-recipes-display ul,.tasty-recipes-display ol{margin-left:0}.tasty-recipes-display h2{font-weight:400;text-transform:lowercase;padding-top:0;margin-top:0}.tasty-recipes-details{font-size:0.8em}.tasty-recipes-label{color:#797B7C}.tasty-recipes-details ul li{list-style-type:none;margin-left:0}.prep-time,.total-time,.cook-time{display:inline-block;width:20%;margin:0.8em 0;vertical-align:top}.tasty-recipes-rating a{text-decoration:none}.tasty-recipes-rating p{margin-bottom:1rem;display:inline-block}.tasty-recipes-rating .rating-label{font-style:italic;font-size:0.8em}.tasty-recipes-notes{margin-bottom:1rem}.tasty-recipes-nutrition{padding:0.5em;border-top:.15em solid #ededed}.tasty-recipes-nutrition ul li{list-style-type:none;font-size:0.8em;margin-left:0}@media only screen and (min-width:520px){.tasty-recipes-nutrition ul li{width:30%}}.tasty-recipe-ingredients h3,.tasty-recipes-ingredients h3,.tasty-recipe-instructions h3,.tasty-recipes-instructions h3,.tasty-recipes-equipment h3,.tasty-recipes-notes h3{font-weight:200;margin-top:0.6em;margin-bottom:1.2em;text-transform:lowercase}.tasty-recipe-ingredients h4,.tasty-recipes-ingredients h4,.tasty-recipe-instructions h4,.tasty-recipes-instructions h4{font-size:1.2em;font-weight:700;text-transform:lowercase;color:#797B7C}.tasty-recipes-description p{font-size:.8em;font-style:italic}.tasty-recipe-video-embed~.tasty-recipes-equipment{padding-top:1em}.tasty-recipes-nutrition h3{font-size:1em;text-align:center;margin-top:1em}.tasty-recipes-notes h3{font-size:1.2em}.tasty-recipes-notes p,.tasty-recipes-notes ul{font-size:0.8em}.tasty-recipes-keywords p{font-size:.8em;margin-top:1em;margin-bottom:1em}.tasty-recipes-entry-footer{text-align:center;padding-top:1rem}.tasty-recipes-source-link{text-align:center}/*Print styles*/ .tasty-recipes-print{font-size:11px;line-height:1.5em}.tasty-recipes-print .tasty-recipes-description p{font-size:1em;line-height:1.5em}.tasty-recipes-print ul,.tasty-recipes-print ol{padding-left:1.25em}.tasty-recipes-print .tasty-recipes-details ul{padding-left:0}.tasty-recipes-print-view h3{font-size:1.2em;letter-spacing:0.1em;margin:0 0 10px 0}.tasty-recipes-print-view .tasty-recipes-ingredients-header,.tasty-recipes-print-view .tasty-recipes-instructions-header{margin:0}.tasty-recipes-print-view .tasty-recipes-ingredients,.tasty-recipes-print-view .tasty-recipes-instructions{padding:1.25em 0}
Air Fryer Buffalo Cauliflower Bites (gluten-free)
A delicious and healthy gluten-free appetizer idea: air fryer buffalo cauliflower bites!
Ingredients
½ Large head of cauliflower cut into florets- bite size
2 eggs, lightly beaten
¾ cup blanched almond or cashew flour
⅓ cup tapioca flour (can sub cassava flour)
1¼ tsp chili powder
¾ tsp paprika
½ tsp onion powder
1 pinch cayenne powder
Hefty pinch of salt
Fresh cracked black pepper
Avocado oil spray- to prevent sticking
½ cup The New Primal Buffalo sauce (mild)
2 tbsp Primal Kitchen Buffalo sauce, plus more for dipping if you like super spicy bites!
1 bunch celery hearts, cleaned & cut into sticks for dipping
¼ c. Primal Kitchen Ranch dressing
Instructions
Step one
Line two baking sheets with parchment paper and set aside. One will be used for the raw cauliflower and one for the cooked.
Step two
In a bowl, combine the almond/cashew flour, tapioca or cassava flour, chili powder, paprika, onion, cayenne, salt & pepper.In another small bowl, add the eggs and 2 tbsp water. Add cauliflower to a separate bowl next to the eggs and flour mixture. This is setting up a “breading” station. Dip each cauliflower floret into the egg mixture and fully coat. Roll in the flour mixture, coating and shake off any excess. Place on a baking sheet and repeat with remaining cauliflower. *Note, use one hand for the egg mixture and your other hand for the wet mixture to prevent your fingers from becoming breaded.
Step three
Heat the air fryer to 375 degrees for about 5 minutes. Once the timer goes off, spray the bottom of the air fryer basket with avocado oil and place the cauliflower in the air fryer keeping them evenly spaced and spread out. Spray the top of the cauliflower with avocado oil.
Step four
You will need to do this in batches if you have a small air fryer.
Air fry the cauliflower at 375 degrees F for 15 minutes. Tip: place the cauliflower in the oven on the prepared baking sheet to keep warm if you’re doing this in batches. Once the cauliflower is almost finished, warm the buffalo sauce in a small, glass bowl. This is best done in the microwave.
Step five
When the cauliflower is finished, drizzle the buffalo sauce over the cauliflower on the prepared baking sheet. Gently toss, ensuring the breading doesn’t fall off. You can stick it back in the air fryer again at 400 degrees for 5 minutes if you like extra crispy cauliflower.
Serve with celery and ranch dressing (we order the Primal Kitchen one from Thrive Market). Enjoy!
What are your favorite go-to appetizers?
Some more of my faves:
xo
Gina
The post Air Fryer Buffalo Cauliflower Bites (gluten-free) appeared first on The Fitnessista.
Continue Reading…
Author Fitnessista | citywomen.co
Selected by CWC


